For detailed information, other images and documents, please select individual articles from the following table.
Floor-levelling mass CERAfix® 201
Plastic-containing, self-spreading liquid cement filler for layer thicknesses from 2 to 30 mm CT-C30-F7
Register now and access more than 125,000 products


Variants
Register now and access more than 125,000 products
Self-spreading
- Easy to apply
- Can be pumped
- Fibre-reinforced: for indoor and outdoor use
Quick-setting
- Reduces downtimes
- Fast buildup of layers
High strength
- High mechanical load-bearing capacity
- Low-pore surface
High plastic content
Excellent adhesion to all common surfaces
Low-stress and low-shrink
- Waterproof
- Low tension
Quality tested in accordance with Euro standard
- In accordance with EN 13813
- Monitored formula
Waterproof
- Can also be used in wet areas with Würth compound sealant*
- No reaction if subsequent contact with moisture
Very low emissions
- Suitable for underfloor heating and electric heating mats
- No reaction if subsequent contact with moisture
Suitable for underfloor heating and electric heating mats
*Can also be applied under a seal with CERAfix 301, including in rooms exposed to moisture (FBK 0, A02, B0, B in accordance with Central Federation of the German Building Trade's technical information leaflet "Hinweise für die Ausfürhrung von flüssig zu verarbeitenden Verbundabdichtungen mit Bekleidungen und Belägen aus Fliesen- und Platten für den Innen- und Außenbereich" (Information on making joint seals with tiles and board cladding and coverings for indoor and outdoor use, available in German only).
Our products featuring the EMICODE label are low emission/environmentally compatible. The EMICODE classification system awards labels to construction products that comply with the very stringent health and environmental requirements of recognised institutes.
Fire behaviour A2fl -s1
Tested in accordance with EN 13813
- Fire behaviour: A2fl -s1
- Release of corrosive substances: CT
- Compressive strength: C30
- Tensile bending strength: F7
EMICODE EC1plus: Very low emissions: The EMICODE classification system distinguishes the environmental and health compatibility of construction products. The lowest-emission products bear the EC1plus mark.
Do not mix more CERAfix 201 than can be used within the processing time. Not suitable as a top surface without additional coverings or top surfaces. Refer to the primer table before use. From a layer thickness of 20 mm, CERAfix 103 epoxy primer must be applied; then dust with TEGAfix 430 quartz sand.
Higher temperatures and low relative humidity accelerate the film formation time; lower temperatures and higher relative humidity extend the film formation time.
Not suitable as a top surface without additional coverings or top surfaces!
Be sure to add water in the appropriate quantities!
If too much water is added, this will result in signs of separation, which are associated with low-strength layers and increased shrinkage. These low-strength layers must be removed with tools!
- The substrate quality is essential for effective floor filling. Absorbent substrates negatively affect the flow characteristics of the filler, so the substrate must be carefully prepared, cleaned and primed!
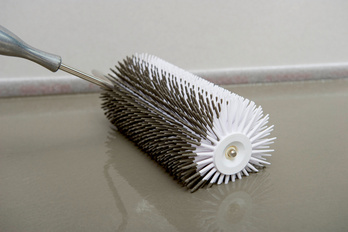
- To reliably prevent pore formation, carefully brush CERAfix 101 into the substrate and allow to dry completely. Use a spiked roller to deaerate the CERAfix 201 layer while it is still liquid!
- If water is removed too quickly, e.g. by room heating, strongly absorbent substrates, draughts, solar radiation etc., there is a risk of cracking!
- The installation location must be ventilated, however, draughts and direct sunlight must be avoided during processing and during the hardening process. The indoor and floor temperature must be at least 5°C during application and for one week thereafter! Dehumidifiers must not be used in the first three days!
- Sulphite leaching adhesive or water-soluble floor covering adhesives must be completely removed!
- Mechanically remove as much as possible of the old, water-resistant floor covering adhesives. Small amounts of dispersion-based water-resistant floor covering adhesives (area percentage < 20 %/m², evenly distributed) can remain on the substrate. Clean the substrate and then prime it with CERAfix 103 or CERAfix 203, sprinkle with plenty of TEGAfix 430 quartz sand and vacuum after curing! Do not exceed the maximum layer thicknesses of 10 mm!
- Not suitable for use on poured tarmac screeds!
- To assess whether it is ready for covering, a moisture measurement must be carried out using the CM device (see table with limit values in the TDS).
- Contact between the cement-based mortar and the magnesite screed leads to the destruction of the magnesite screed by "magnesia expansion" chemical reaction. Backwards moisture load from the substrate must be prevented using appropriate means. Magnesite substrates must be mechanically roughened and primed pore-tight with CERAfix 103 or CERAfix 203 epoxy resin. Spread plenty of fresh TEGAfix 430 quartz sand over the fresh epoxy resin layer.
- After approx. 12 hours*, further laying work can be performed. Do not exceed the maximum layer thicknesses of 10 mm!
- When using a mixing pump, for example PFT G4 or G5 or equivalent, the mixing pump and hoses must be flushed out in the event that work is interrupted!
- If using a PFT G4 mixing pump, the water flow meter must be set to approx. 370-420 l/h using the standard PFT G4 mixing shaft, the D6-3 rotor and the Twister D6-3 stator. The flow rate with this configuration is approximately 20 l/min. For larger layer thicknesses/areas, it is recommended to use the pump unit, D8-1.5 rotor and D8-1.5 stator. The water flow meter must then be set to approx. 800-850 l/hour. The flow rate is then approximately 35 l/min. The PFT consistency test socket can be used to check and set the correct water supply based on the flow spread. This must not exceed 61 cm on prepared substrate and should be checked continuously during processing! If the spreading dimensions are exceeded, too much water has been added. Consequently, signs of separation may appear that can lead to insufficient strength development and increased shrinkage with sunken layers.
- Preliminary work, such as filling transitions and levelling out ruptured areas and unevenness, is performed using CERAfix 202 permanent repair mortar!
- Edge, field, building and movement joints must be observed. These must be retained or incorporated at the prescribed location and sealed off by suitable means, e.g. CERAfix 208 edge strips! Dummy joints must be carved out once the CERAfix 201 has hardened up to a third of the applied layer thicknesses!
- Only use clean tools and clean water!
- The technical data sheets of the products used must be observed!
- Protect surfaces that do not require treatment against exposure to CERAfix 201!
Currently applicable regulations must be observed! For example:
- DIN 18157
- DIN 18534
- DIN 18560
- DIN EN 13813
- DIN 1055
- TKB information sheets from Industrieverband Klebstoffe e. V. (Industry Association of Adhesives)
- BEB information sheets, published by Bundesverband Estrich und Belag e. V. (Federal Association for Screeds and Coverings)
- Technical information "Interface coordination for heated floor structures".
- ZDB information sheets, published by Fachverband des deutschen Fliesengewerbes (German Tiling Industry Association).


| Primer table | ||
| Substrate | For layer thicknesses up to 20 mm | For layer thicknesses up to 30 mm |
| Concrete, cement screed, rapid cement screed | CERAfix ®101 | CERAfix 103 or CERAfix 203 *** |
| Smooth or formwork smooth, cement-bound substrates without layers of sinter | CERAfix ®103 or CERAfix 203 *** | CERAfix 103 or CERAfix 203 *** |
| Solid ceramic layers. | Roughen and then with CERAfix 103 or CERAfix 203 *** For layer thicknesses up to maximum 15 mm | |
| Calcium sulphate layers | Sand and then with CERAfix 103 or CERAfix 203 *** For layer thicknesses up to max. 15 mm | |
| ***Always spread TEGAfix 403 quartz sand on top of CERAfix 103 or CERAfix 203! Once cured (approx. 12 hours), sweep off and vacuum up the excess quartz sand. Then level out with CERAfix 201 | ||
| Permissible moisture content of levelling mass and cement-based base material is determined using the CM device | |||
| Flooring | Heated | Unheated | |
| ceramic tiles or natural/artificial stone | Thick bed | 2.0 % | 2.0 % |
| Water vapour diffusion-tight linings | 1.8 % | 2.0 % | |
| Textile coverings | Blocks water vapour | 1.8 % | 2.5 % |
| Permeable to water vapour | 2.0 % | 3.0 % | |
| Parquet and laminate flooring | Floating installation | 1.8 % | 2.0 % |
| The CM measurement must be conducted in accordance with the current work instruction FBH-AD from technical information "Interface coordination for heated floor constructions". | |||
CERAfix 201 is used for compensating and levelling uneven floors on concrete in accordance with DIN 1045, heated and unheated cement screeds in accordance with DIN 18560, old, securely adhered tile coverings and quick cement screeds. CERAfix 201 is suitable for outdoor use and for environments subjected to moisture together with a corresponding Würth compound sealant. CERAfix 201 is used in coat thicknesses of 2-30 mm.
The surface must be solid, load-bearing, clean, dry and free from separating substances.
- For coating thicknesses ≤ 30 mm, leave concrete or cement screeds that have been primed with CERAfix 101 or CERAfix 102 to dry as fully as possible (approx. 6-12 hours)
- Mixing ratio 6.0 to 6.3 l water: 25 kg CERAfix 201
- Provide clean water, add CERAfix 201 and mix into a lump-free mass for about 3 minutes. Add unmixed material to the mixing process and then mix again.
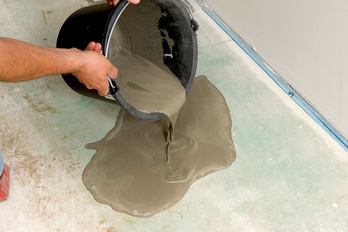
- Pour CERAfix 201 onto the primed substrate and spread evenly within the working
- time. Deaerate and encourage the flow of the still liquid material, e.g. with a spiked roller or
- other suitable tool
- Hardening CERAfix 201 must be protected from quick extraction of water, e.g. through direct sunlight, high temperatures and draughts!
- 101 or CERAfix 102 required
- CERAfix 201 can be covered with tiles and panels after approx. 16 hours*
- For more important information, please refer to the technical data sheet.
Select RAL-colour code
!! NOTE: On-screen visualisation of the colour differs from real colour shade!!


